LinkedIn Patches #22 Answer
Stuck on today’s grid? Get the LinkedIn Patches #22 solution and expert logic to maintain your streak instantly. Beyond the answer, explore our tactical hints to refine your spatial reasoning and master the game through daily practice.
Patches #22 Answer
Start
Answer
Patches #22 Expert Logic
Here is your deep-dive strategic breakdown for this LinkedIn Patches puzzle.
🧩 Deep Logic Analysis
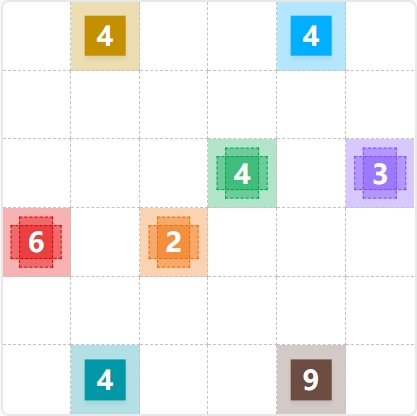
To conquer this grid, we have to look for the most restricted areas first. This puzzle provides an elegant chain reaction if you know exactly where to apply pressure.
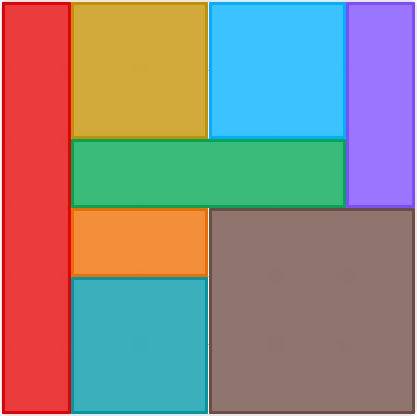
- Step 1: Anchor with the Giants (Brown 9 & Purple 3) The most obvious starting point is the Brown 9 in the bottom right. On a 6x6 grid, a 1x9 rectangle is impossible, meaning this must be a 3x3 square. Because it sits at the bottom edge, it perfectly locks into the bottom-right corner (spanning columns 4–6, rows 4–6). Once the Brown 9 is placed, look at the Purple 3. It sits in column 6, right above the newly placed 9. Because the 9 blocks its path downward, the Purple 3 is forced to grow upwards, becoming a 1x3 vertical strip that entirely fills the rest of the rightmost edge.
- Step 2: Securing the Left Perimeter Jump to the left edge with the Red 6. While 6 can be a 2x3 or 3x2, expanding horizontally would severely choke the middle of the board and leave the Teal 4 without a valid shape. The most logical play is a 1x6 vertical column spanning the entire left edge, boxing the rest of the grid in.
- Step 3: The Middle Squeeze With the left and right borders secured, and the bottom-right corner filled, the remaining shapes fall into place via a beautiful process of elimination. The Teal 4 is boxed into the bottom-left corner, naturally forming a 2x2 square. The Orange 2 is trapped right above it, forming a 1x2 horizontal strip.
- Step 4: Filling the Cap The Green 4 is now forced into a 1x4 horizontal bridge straight across the middle. This perfectly splits the top half, leaving two flawless 2x2 voids for the Yellow 4 and the Light Blue 4 to claim their rightful corners.
🎓 Lessons Learned From Patches #22
- The Perimeter Rule: Always check your edge pieces first. As seen with the Red 6 and Purple 3, edges and corners naturally eliminate 50% of a shape's potential growth directions, making them highly predictable starting points.
- Prime Number Strategy: Prime numbers (like the Purple 3) are incredibly valuable because they only have one dimensional pair (1x3 or 3x1). When a prime sits near a grid wall or another massive shape, its orientation is almost always forced immediately.
- The Power of Deduction: Like any logic puzzle, it takes deliberate practice to instantly spot these hidden constraints. Don't guess; let the largest numbers dictate the borders, and the smaller numbers will naturally fill the vacuum.
💡 Trivia
- The Geometry of 9: In grid-based logic puzzles, 9 is a uniquely powerful clue. Because it is the only single-digit odd composite number, it almost universally guarantees a 3x3 square placement unless the grid is exceptionally large (9x9 or bigger).
- Versatile Perfect Numbers: The number 6 is the smallest "perfect number" (its divisors 1, 2, and 3 add up to 6). In area-allocation puzzles, this makes 6 one of the trickiest low numbers to place, as it boasts four potential rectangular configurations (1x6, 6x1, 2x3, 3x2).
❓ FAQ
Why couldn't the Brown 9 be a 1x9 rectangle?
The puzzle takes place entirely within a 6x6 grid. A shape requiring an area of 9 cannot fit linearly within a maximum length of 6, which mathematically forces the shape to adopt its only other integer dimensions: a 3x3 square.
How do we know the Red 6 is vertical and not a 2x3 block?
If the Red 6 were a 2x3 rectangle, it would push too far into the grid's interior. This would completely cut off the Teal 4 in the bottom left, leaving it mathematically impossible to form a 4-unit rectangle without overlapping the Red 6 or the Brown 9.
Why does the Green 4 have to be horizontal?
By the time you secure the perimeter shapes (Red 6, Purple 3) and the bottom anchors (Brown 9, Teal 4, Orange 2), the only available contiguous space containing the Green 4's coordinate is a 1-cell high horizontal channel. Vertical growth is completely blocked by the Orange 2 below it and the top row squares.