LinkedIn Patches #23 Answer
Stuck on today’s grid? Get the LinkedIn Patches #23 solution and expert logic to maintain your streak instantly. Beyond the answer, explore our tactical hints to refine your spatial reasoning and master the game through daily practice.
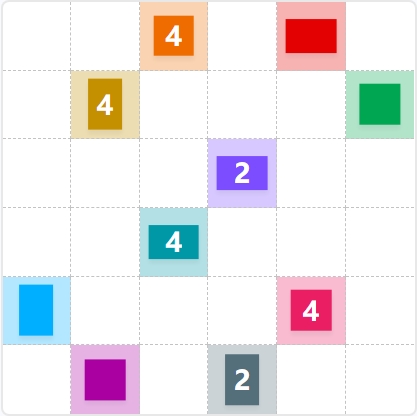
Patches #23 Answer
Start
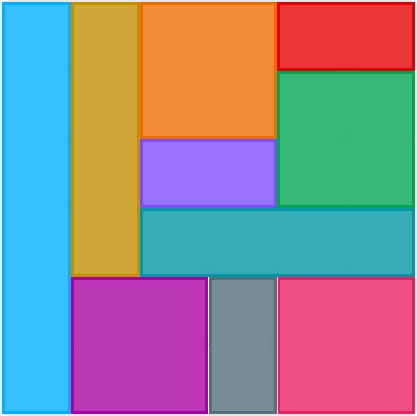
Answer
Patches #23 Expert Logic
🧩 Deep Logic Analysis
Solving Patches #23 requires a keen eye for "anchor shapes"—those clues that, by their position or orientation, dictate the flow of the entire grid. To master these puzzles, consistent practice in identifying these anchors is essential.
1. The Left-Hand Anchor (Light Blue): The Light Blue vertical rectangle on the far-left edge is a classic "column-filler." In a grid, a vertical clue on the perimeter often needs to extend to its maximum logical length to avoid leaving unreachable "islands." Stretching this to a column immediately isolates the first vertical lane.
2. The Corner Constraints (Red & Pink): Next, we look at the corners. The Red rectangle in the top-right corner is oriented horizontally. To fill the corner effectively without blocking other shapes, it expands into a rectangle. Simultaneously, the Pink 4 in the bottom-right corner naturally forms a square, as it is the most efficient shape to anchor that corner.
3. The Middle Horizontal (Teal 4): With the left column and right-side corners defined, the Teal 4 horizontal rectangle becomes a bottleneck. It must bridge the gap across the middle. To accommodate the shapes above and below it, it stretches into a strip, effectively bisecting the lower half of the grid.
4. The Central Tetris (Orange, Purple, and Violet): Once the "frame" is built, the remaining pieces fall into place like a jigsaw:
- The Orange 4 expands into a square to fill the top-center.
- The Purple 2 fits perfectly as a horizontal bar beneath the Orange square.
- The Violet square (bottom-left) expands to a to fill the remaining void next to the Light Blue column.
- Finally, the Dark Grey 2 and Gold 4 fill the remaining vertical gaps, completing the 36-square mosaic.
🎓 Lessons Learned From Patches #23
- The Perimeter Rule: Always look at shapes touching the edges first. These shapes have fewer directions in which they can grow, making their final dimensions easier to predict than those in the center.
- The "Gap-Fill" Strategy: When you have two large shapes placed (like the Blue and the Pink), look at the empty space between them. Often, only one specific dimension (like the Teal) will fit perfectly without leaving a single-cell hole.
💡 Trivia
- The Power of 36: This grid is a perfect square, totaling 36 units. In mathematics, 36 is a "triangular square number," meaning it can form both a perfect square and a perfect equilateral triangle.
- Minimalist Logic: Despite having 10 different colors, this specific puzzle relies heavily on the number 4. By defining the "4-unit" shapes early, the "2-unit" shapes (Purple and Grey) are forced into their positions by the remaining geometry.
❓ FAQ
Why couldn't the Light Blue shape be a rectangle instead of a strip?
If the Light Blue shape expanded to a width of 2, it would overlap with the Gold 4 clue, violating the rule that each "patch" must contain exactly one clue icon of its own color.
What makes the Green shape a square instead of a smaller rectangle?
In Patches, every single cell of the grid must be occupied. After placing the Red and the Pink , the remaining void on the right side is exactly 9 cells in a configuration, which the Green clue must claim to complete the grid.
How do we know the Orange 4 must be a square and not a strip?
If the Orange 4 were a horizontal strip, it would block the Red shape from reaching the top-right corner or force the Gold 4 into a shape that would overlap with other central clues. The configuration is the only one that preserves the "breathing room" for the surrounding logic.