LinkedIn Patches #24 Answer
Stuck on today’s grid? Get the LinkedIn Patches #24 solution and expert logic to maintain your streak instantly. Beyond the answer, explore our tactical hints to refine your spatial reasoning and master the game through daily practice.
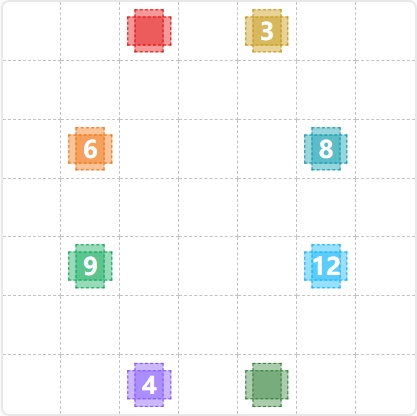
Patches #24 Answer
Start
Answer

Patches #24 Expert Logic
This is a breakdown of the logic and strategy for Patches #24. Mastering these puzzles requires a blend of arithmetic and spatial reasoning—a skill that only improves with consistent practice.
🧩 Deep Logic Analysis
To solve Patches #24, we must first identify the grid dimensions. By counting the dashed lines, we find a grid, totaling units of area.
1. The Heavy Hitters (Green 9 & Light Blue 12)
The most efficient starting point is the bottom-middle section. The Green 9 and Light Blue 12 clues are positioned such that they must share a horizontal boundary. Given the -column width, the only logical configuration is a square for the Green 9 and a rectangle for the Light Blue 12. Together, they form a block that spans the entire width of the grid across rows 4, 5, and 6.
2. The Bottom Perimeter (Purple 4 & Dark Green)
Once the block is placed, only one row remains at the bottom (Row 7). The Purple 4 clue sits in this row. To satisfy its area requirement, it must be a strip. This leaves a gap to its right, which is filled by the unlabeled Dark Green patch.
3. The Mid-Section (Orange 6 & Teal 8)
Moving upward, we have two rows left (Rows 2 and 3) before hitting the top edge. The Orange 6 and Teal 8 clues must occupy this space (14 total units). To accommodate the clues' lateral positions, the Orange 6 becomes a block and the Teal 8 becomes a block.
4. The Top Cap (Yellow 3 & Red)
Finally, the top row (Row 1) remains. The Yellow 3 clue is positioned on the right, necessitating a strip. The remaining space on the left is claimed by the unlabeled Red patch, completing the -unit grid perfectly.
🎓 Lessons Learned From Patches #24
- The Anchor Strategy: Always look for "High-Area" clues like the 12 and 9. Because their factor pairs (e.g., , ) are limited by the grid's total width, they act as anchors that dictate the placement of smaller, more flexible shapes.
- The "Remainder" Rule: In puzzles with unlabeled patches (like the Red and Dark Green boxes here), calculate the total area of the grid () and subtract the sum of the known clues (). The remaining units must be distributed among the unlabeled patches, helping you verify their dimensions ().
💡 Trivia
- Highly Composite Numbers: The number 12 is a "highly composite number," meaning it has more divisors than any number smaller than it (). In Patches, this makes 12-clues particularly tricky because they can manifest as or .
- The Square Constraint: The Green 9 is the only odd-numbered clue in this grid (besides the 3s) that can form a perfect square. Because squares are "stiff" (they can't be rotated into different rectangular shapes), they often serve as the "key" that unlocks the rest of the grid's layout.
❓ FAQ
How do I determine the grid size if it isn't explicitly stated?
Count the number of individual square units along the top and side edges. In this puzzle, there are 7 units across and 7 units down. Knowing the total area is is essential for identifying the size of unlabeled patches.
Why couldn't the Orange 6 be a 1x6 strip?
A strip would leave only one column remaining in that row. This would make it impossible for the Teal 8 (which requires at least 2 columns in any or configuration) to fit alongside it.
What should I do when I see a patch without a number?
Treat it as a "negative space" puzzle. Complete all the numbered patches first. The unlabeled patch will naturally be defined by the boundaries of its neighbors and the grid's edge. Consistent practice helps you spot these voids earlier in the process.