LinkedIn Patches #30 Answer
Stuck on today’s grid? Get the LinkedIn Patches #30 solution and expert logic to maintain your streak instantly. Beyond the answer, explore our tactical hints to refine your spatial reasoning and master the game through daily practice.
Patches #30 Answer
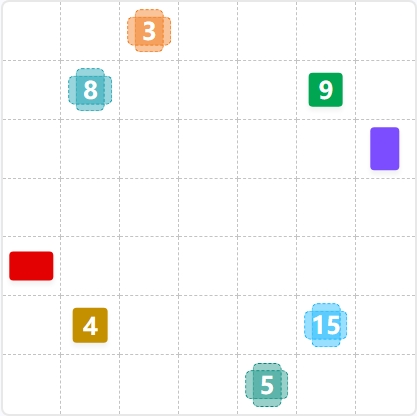
Start
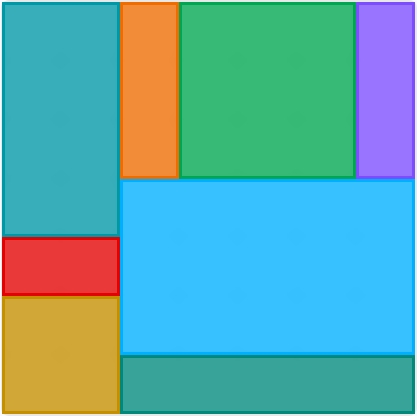
Answer
Patches #30 Expert Logic
🧩 Deep Logic Analysis
Solving Patches #30 requires a blend of "anchor hunting" and spatial elimination. To master this grid, you must treat every shape as a fixed boundary that dictates the survival of its neighbors. Through regular practice, these geometric patterns become second nature.
1. The Square Anchors (Green 9 & Gold 4) The most efficient starting points are the numbers with the fewest factoring possibilities. The Green 9 and Gold 4 are the primary anchors. A 9-patch is almost always a square in these puzzles, as a strip rarely fits the grid constraints. Once the Green 9 is placed in the upper-right quadrant, it creates a "bottleneck" that defines the space for the Orange 3 and Purple patches. Similarly, the Gold 4 in the bottom left must be a square to avoid blocking the surrounding shapes.
2. The Light Blue 15 Foundation With the Green 9 and Gold 4 established, the Light Blue 15 becomes the dominant constraint. A 15-patch can be (impossible here), , or . Given the width of the grid and the remaining vertical space under the Green 9, the Light Blue 15 is forced into a horizontal block. This placement acts as a bridge, locking the bottom row and the right-hand column into place.
3. The Western Perimeter Chain Reaction The left side of the grid is resolved through a top-down logic chain. The Teal 8 must be a vertical rectangle to maximize the available corner space. This leaves a small gap directly below it, perfectly accommodating the Red block. The remaining space in the bottom-left corner is then naturally claimed by the Gold 4, completing the western perimeter.
4. Finalizing the Gaps Once the larger blocks are set, the remaining "ghost" shapes (the Purple and Orange patches) fill the specific voids. The Orange 3 is squeezed into a vertical strip between the Teal and Green patches, while the Dark Teal 5 takes the only remaining slot at the very bottom.
🎓 Lessons Learned From Patches #30
- The Odd-Number Constraint: Larger odd numbers like 9 or 15 are often the "skeleton" of the puzzle. Because they have fewer factor pairs (e.g., 15 is only or ), placing them first often solves 50% of the grid immediately.
- Corner Crowding: Always look at the corners first. The Teal 8 and Gold 4 define the boundaries of the grid. If a shape can only fit in a corner in one specific orientation, lock it in early to see how it "pushes" other shapes toward the center.
💡 Trivia
- Square Logic: In geometry, a square is the only way to arrange 9 units so that every unit is adjacent to at least two others while maintaining a perfectly symmetrical perimeter.
- The 49-Unit Secret: This specific grid is a square, totaling 49 units. Interestingly, the sum of all patch values () equals exactly 49, meaning there is zero wasted space—a hallmark of "Perfect Tiling" puzzles.
❓ FAQ
Why couldn't the Light Blue 15 be a vertical 3x5 strip?
If the Light Blue 15 were oriented vertically, it would collide with the Green 9 anchor or extend past the bottom boundary of the grid. The horizontal orientation is the only way to maintain the grid integrity.
What defines the size of the Purple and Red patches if they have no numbers?
In some puzzles, these are "fillers." Their dimensions are determined by the "process of elimination." Once the numbered patches are logically placed, the remaining empty cells form the exact dimensions of the unnumbered shapes.
Is there always only one solution to these puzzles?
Yes. Through diligent practice, you will find that the constraints of Patches are designed so that each shape's placement is "forced." If you find yourself guessing between two viable options, you likely haven't found the specific anchor that breaks the stalemate.