LinkedIn Patches #33 Answer
Stuck on today’s grid? Get the LinkedIn Patches #33 solution and expert logic to maintain your streak instantly. Beyond the answer, explore our tactical hints to refine your spatial reasoning and master the game through daily practice.
Patches #33 Answer
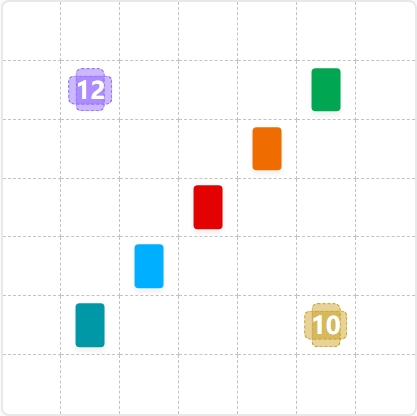
Start
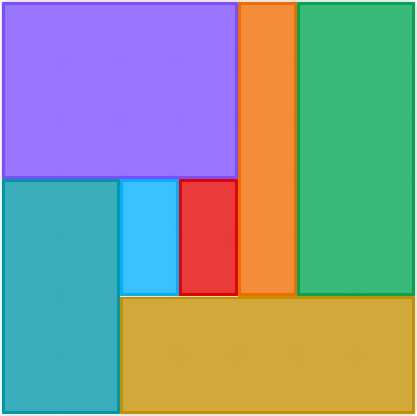
Answer
Patches #33 Expert Logic
This deep dive into LinkedIn Patches #33 deconstructs the spatial reasoning required to master this 6x6 grid. Whether you are a daily player or a logic puzzle enthusiast, understanding the interplay between numbered anchors and "filler" shapes is the best way to practice your cognitive agility.
🧩 Deep Logic Analysis
The secret to solving Patches #33 lies in identifying the "immovable objects"—the numbered patches—and seeing how they squeeze the remaining space.
-
The Purple 12 Anchor:
Located near the top-left, the 12 has two realistic rectangular configurations: 3x4 or 4x3. Looking at the solved grid, the Purple patch extends 4 units wide and 3 units deep. This is forced because extending it 4 units deep would overlap with the Teal seed in the bottom-left quadrant. -
The Yellow 10 Foundation:
The 10 is your second primary constraint. In a 6x6 grid, a 5x2 rectangle is a massive footprint. By placing it along the bottom edge (5 units wide, 2 units high), it perfectly accommodates the Teal seed to its left and leaves exactly enough vertical height for the remaining colored strips. -
The Perimeter Squeeze (Green and Orange):
With the Purple 12 taking up the top-left 4x3 area, the remaining space on the far right consists of two narrow columns. The Green and Orange patches are forced into these vertical channels. The Orange patch becomes a 1x4 strip, while the Green patch takes the far-right 1x4 slot. -
The Final Chain Reaction:
The remaining "void" in the center-left is filled by the Teal, Light Blue, and Red patches. Once the Yellow 10 is placed at the bottom, the Teal patch is forced into a 2x3 vertical block in the bottom-left corner. This leaves a small 2x2 gap in the center, which is split vertically into two 1x2 patches (Light Blue and Red).
🎓 Lessons Learned From Patches #33
- The Factorization First Rule: Before placing a numbered patch, mentally list its factors. For 12, it's 2x6 or 3x4. In a 6x6 grid, 2x6 is often too "stretchy" and traps other seeds, making 3x4 the statistically more likely starting point.
- The Corner-Inward Strategy: Always look at the corners first. If a seed is near a corner, it almost always expands to fill that vertex. In this puzzle, the Purple 12 and Teal patches define the entire left-hand perimeter.
- Negative Space Awareness: Sometimes the best way to solve a patch is to look at where it can't go. By realizing the Yellow 10 couldn't be vertical without blocking the Green seed, its horizontal orientation becomes a logical certainty.
💡 Trivia
- Superior Highly Composite Numbers: The number 12 is a "superior highly composite number," meaning it has more divisors than any other number relative to its size. This is why 12-unit patches are so versatile in these puzzles—they offer the most geometric flexibility.
- The 6x6 Magic: A 6x6 grid contains 36 total squares. In Patches #33, the numbered shapes (12 and 10) account for over 60% of the total area, meaning the "math" of the puzzle is largely solved the moment those two are placed correctly.
❓ FAQ
Why couldn't the Yellow 10 be a 2x5 vertical rectangle?
If the Yellow patch were oriented vertically (2 units wide and 5 units high), it would occupy the space needed by the Orange and Green seeds, effectively "smothering" them and making a valid solution impossible.
How do we know the Teal patch is 2x3 and not a different size?
Once the Purple 12 (4x3) and the Yellow 10 (5x2) are locked in, the bottom-left corner is left with a 2x3 empty space. Since the Teal seed is located there, it must expand to fill the entire available vacancy to satisfy the grid-filling requirement.
What is the best way to improve at these logic puzzles?
The most effective method is to practice identifying the largest numbered patch first. These "anchor" shapes dictate the boundaries of the smaller patches and usually reveal the intended path of the puzzle designer within the first few moves.