LinkedIn Patches #44 Answer
Stuck on today’s grid? Get the LinkedIn Patches #44 solution and expert logic to maintain your streak instantly. Beyond the answer, explore our tactical hints to refine your spatial reasoning and master the game through daily practice.
Patches #44 Answer
Start

Answer
Patches #44 Expert Logic
Of course. As a LinkedIn Patches expert and SEO content strategist, I'd be happy to deconstruct this puzzle for you. Here is a deep analysis of Patches #44.
🧩 Deep Logic Analysis
This grid might seem intimidating at first, but a single, powerful clue cracks it wide open. The key is to find the piece with the least ambiguity and build from there. With a little practice, you'll spot these anchors instantly.
-
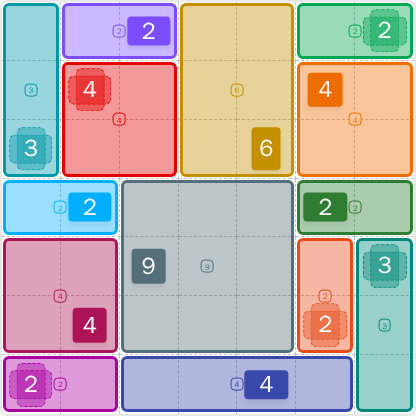
The Anchor Piece (The Grey 9): Your starting point is unequivocally the Grey 9. On a 6x6 grid, a 9-cell shape has very limited configurations. A 1x9 strip is impossible. Therefore, the Grey 9 must be a 3x3 square. Placing this piece centrally is the critical first move, as it immediately creates defined boundaries for all adjacent shapes.
-
The First Chain Reaction (The Gold 6): With the 3x3 square in place, look at the Gold 6. The Grey 9 has created a vertical corridor that is only 2 cells wide to its right. This means the Gold 6 cannot be a 1x6 strip. Its only possible configuration in this constrained space is a 2x3 vertical rectangle.
-
Solving the Bottom Row (The Dark Blue 4): The placement of the Grey 9 also heavily constrains the bottom of the grid. It leaves a 3-cell wide space directly beneath it. The Dark Blue 4 clue sits in this channel. It cannot be a 2x2 square here. Its only option is to be a 1x4 horizontal strip, which tucks neatly under the Grey 9 and extends one cell to the right.
-
Corner Dominoes: Now we turn to the corners, which are heavily influenced by our initial placements.
- The Bottom-Left Pink 2, being in the corner, could be vertical or horizontal. However, the placement of the Dark Blue 4 leaves no room for a 1x2 horizontal piece. It is forced to be a 2x1 vertical piece.
- This forces the Maroon 4 directly above it into a 2x2 square.
- Similarly, in the Top-Right Green 2, the newly placed Gold 6 blocks it from being a vertical 2x1 piece. It must be a 1x2 horizontal piece.
-
Filling the Gaps: With these major shapes locked in, the rest of the puzzle resolves itself by filling the remaining rectangular voids. The Orange 4, Red 4, and remaining 2s and 3s have only one valid placement left, completing the grid.
🎓 Lessons Learned From Patches #44
- Identify the "Anchor Piece": Always scan the grid for numbers with the fewest possible shapes. Large perfect squares (like 9, 16, 25) or large prime numbers are your best friends. They act as an anchor, bringing order to the surrounding chaos.
- Use the "Corridor Constraint": Once you place a large shape, it creates narrow "corridors." Pay close attention to these, as they severely limit the orientation of other pieces. The Gold 6 was a perfect example of a piece forced into a vertical orientation by the Grey 9's placement.
- Don't Forget the Hidden Shapes: Notice how the final solved grid contains more shapes than the initial number clues? A key piece of practice is remembering that not every patch will have a visible number. Solving the revealed pieces will create spaces that perfectly define these hidden shapes.
💡 Trivia
- The number 9 is the first composite odd number and also a perfect square (3²). Its unique status as a small, odd perfect square is precisely why it was the logical key to this entire puzzle.
- The sum of all the visible numbers on the unsolved grid is 41. However, the total area of the 6x6 grid is only 36 cells. This is a deliberate feature of Patches puzzles, confirming that not every patch is assigned a visible number clue from the start.
❓ FAQ
Why did the Grey 9 have to be a 3x3 square?
The grid is 6x6, meaning no shape can be longer than 6 cells in any direction. The only factors of 9 are 1, 3, and 9. A 1x9 or 9x1 rectangle is too long to fit on the grid. This leaves only one possible configuration for a 9-cell shape: a 3x3 square.
Couldn't the Orange 4 have been a 1x4 horizontal strip?
If you placed the Orange 4 as a 1x4 horizontal strip, it would have created an unsolvable problem. It would either collide with the space needed by the Gold 6 or create a single-cell-wide gap next to it. Since no piece can be 1x1, this would make the puzzle impossible to solve. Therefore, it had to be a 2x2 square to allow other valid shapes to fit around it.
Why wasn't the Gold 6 a 1x6 strip spanning the whole grid?
The placement of the central 3x3 Grey 9 block is the reason. A 1x6 or 6x1 strip must span the entire grid in one direction without being broken. The Grey 9 sits squarely in the middle of the board, physically blocking any path for a 1x6 piece to pass through that area.