LinkedIn Patches #50 Answer
Stuck on today’s grid? Get the LinkedIn Patches #50 solution and expert logic to maintain your streak instantly. Beyond the answer, explore our tactical hints to refine your spatial reasoning and master the game through daily practice.
Patches #50 Answer
Start
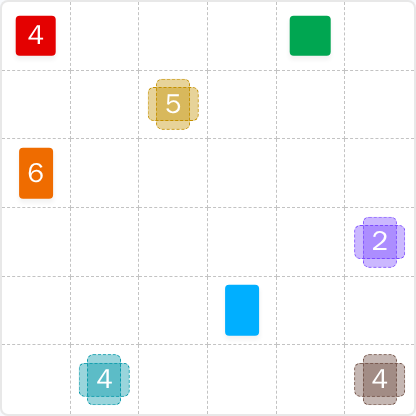
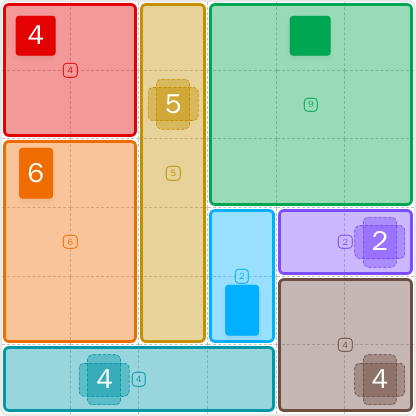
Answer
Patches #50 Expert Logic
Of course! Here is a deep-dive analysis of LinkedIn Patches #50.
🧩 Deep Logic Analysis
This grid provided a masterclass in using corners and edges to create a logical cascade. The key was identifying the most constrained pieces first and letting them dictate the flow of the solution.
-
The Corner Anchors: The most logical starting points were the Red 4 in the top-left corner and the Brown 4 in the bottom-right. As squares, their 2x2 shape and position were immediately fixed. Placing these two pieces instantly removes ambiguity and sets hard boundaries for adjacent shapes.
-
The Edge Constraint: With the corners locked, the next obvious move was the Teal 4 on the bottom edge. Since it's on an edge, it must be a 1x4 or 4x1 rectangle. The Brown 4 already occupied the last two cells of the bottom row, forcing the Teal 4 to be a 4x1 shape spanning the first four columns of that bottom row.
-
The First Chain Reaction: Placing the Red 4 (top-left) directly constrained the Orange 6. The Orange 6 clue, located in the first column, was blocked from moving up by the Red 4 and blocked at the very bottom by the Teal 4. This left only a 3-row high space for a 6-cell shape. A 1x6 was too tall, so the only logical fit was the 2x3 rectangle shown in the solution.
-
The Prime Directive: The Gold 5, being a prime number, could only be a 1x5 or 5x1 strip. After placing the shapes above, a solid wall existed on the left side of the grid. A horizontal 5x1 strip was impossible. Therefore, it had to be a vertical 1x5 strip, which fit perfectly into the newly formed slot in the third column.
-
Closing the Gaps: The Purple 2, locked on the right edge, was blocked from expanding downwards by the Brown 4. This forced it into the only available space: a 2x1 horizontal shape. This placement, in turn, created a small 1x2 vertical slot for the unlabeled Light Blue piece, defining its shape and area (2).
-
The Final Reveal: With every other piece placed, the remaining empty space defined the unlabeled Green patch. It was revealed to be a 3x3 square, giving it a value of 9. This is a classic example of solving a piece by solving everything around it.
🎓 Lessons Learned From Patches #50
- The Corner & Edge Rule is Your Best Friend: Always start with clues in corners or along the edges. These pieces have the fewest possible placements and act as anchors that simplify the rest of the grid. This is foundational practice for speed and accuracy.
- Leverage Prime Numbers: Clues with prime numbers (like 5) are powerful because their shape is always a 1xN strip. Scan for these early, as they drastically reduce complexity and often create long, definitive boundaries for other shapes.
- Solve By Elimination: Don't be afraid to solve the space around an unknown piece. The Green 9 was impossible to solve directly. By methodically placing all the other patches, its shape and area were revealed by the remaining void.
💡 Trivia
- A Trio of Squares: This puzzle is unique because every number that is a perfect square (4, 4, and 9) also manifested as a perfect geometric square (2x2, 2x2, and 3x3). While a 9-cell patch could be a 1x9 strip, seeing them align so neatly is a mark of elegant puzzle design.
- The Perfection of Six: The number 6 (seen in the Orange patch) is the first "perfect number." In number theory, a perfect number is a positive integer that is equal to the sum of its proper positive divisors. The divisors of 6 are 1, 2, and 3, and 1 + 2 + 3 = 6. The next perfect number is 28.
❓ FAQ
Why couldn't the Gold 5 be a horizontal 5x1 strip?
A horizontal 5x1 strip would need five adjacent, empty horizontal cells. After placing the Red 4 and the Orange 6, a wall was formed along the second column. The Gold 5's clue was in the third column, so a horizontal strip would have to extend into the already-occupied columns 1 and 2, which is impossible. The only valid orientation was the vertical 1x5 strip.
How was the area of the Green patch determined without a number?
The Green patch was solved using the "leftover" or "process of elimination" strategy. This is a key technique to practice. Once every other patch with a known area (4, 6, 5, 2, 4, 4) was correctly placed on the grid, the Green patch was simply the last remaining empty space. By observing its boundaries, we could see it formed a 3x3 area, thereby assigning it a value of 9.
Was the Orange 6 forced to be a 2x3 rectangle?
Yes, its placement was completely forced by its neighbors. The Red 4 blocked it from expanding upward, and the Teal 4 occupied the bottom-most row. This left only three vertical rows (rows 3, 4, and 5) available for the 6-cell shape to occupy starting from column 1. A 1x6 shape was too tall for this space, and a 3x2 (3 wide, 2 tall) wouldn't fit. The 2x3 (2 wide, 3 tall) was the only configuration that fit the area perfectly.